|
|
Home ::
Home Draft Beer CO2 System Instructions
Home Draft Beer CO2 System Instructions
 |
|---|
|
REGULATOR:
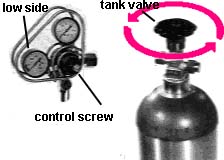
Your regulator will come with one or two gauges. All regulators are equipped with a gauge to monitor the low side pressure which is the pressure that exits the regulator out of the line that has the gas quick-disconnect on it. Some regulators come equipped with a second gauge that monitors the high side pressure. This is the pressure in the tank thus the amount of gas that is left in it. |
 |
|
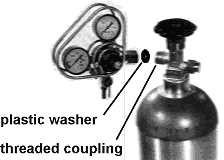
Using your regulator: First connect the regulator to the tank using the threaded coupling making sure that you use the small plastic washer in the coupling. The washer is very important and can usually be found attached to a new regulator with some sort of tie. Once the regulator is securely attached to the tank, turn the tank valve on. The gauge monitoring the high side pressure will be reading. The other gauge will not move until the control screw has been turned. Turning the screw clockwise increased the low side pressure and counterclockwise reduces the pressure. Remember that once you pressurize a keg you can only drop the pressure by relieving all the pressure and pressurizing again. This means that turning your control screw counterclockwise will not change the pressure in the line or tank unless you relieve that pressure. The low side pressure gauge will display keg and line pressure. | 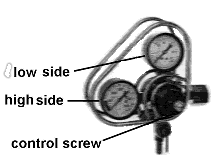 |
|
TAPPING YOUR KEG:
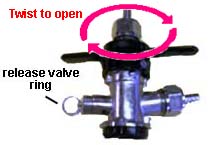
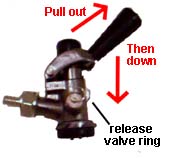
You must first relieve the pressure in the keg. First seat the tap on your keg. and then put the handle on the tap in the open position. Depending on the style of tap you have, this is achieved by twisting the "T" handle clockwise, or pulling out on the handle and pushing it down. (red instructions)
Then turn the tank valve on the to of your CO2 tank off (clockwise).
Turn the control screw on your regulator counterclockwise one full turn.
Pull the release ring until all the pressure is released. Your low side gauge should drop to 0 psi. |
 |
|
Dispensing your beer:
Turn the tank valve on the top of your CO2 tank on. (counterclockwise,red instructions).
Your low side gauge should still read 0 psi. If not, repeat the previous four steps, turning the control screw on your regulator counterclockwise another full turn. |
 |
| Slowly turn the control screw control screw clockwise until the low side gauge
reads 2 to 3 psi. Open the faucet and pour the chilled beer into a glass. Be sure to tilt the glass at a 45 degree angle and pour down the side of your glass. Increase the flow by using the control screw until beer is flowing properly. The low side pressure is normally not any higher than 7 psi, so you want to do this a pound or so at a time.
|
 |
|


