WARNING
Anytime you work with high pressures, such as bottled CO2, there is a danger of hoses rupturing and of glass bottles breaking. Always use proper eye protection to prevent harm from such occurrences. Also be sure to use regulators and kegs that have properly operating, built-in pressure relief valves.

STEP BY STEP INSTRUCTIONS:
1) Make sure that the CO2 supply is turned off and that the keg is not pressurized. Have all equipment sterilized.
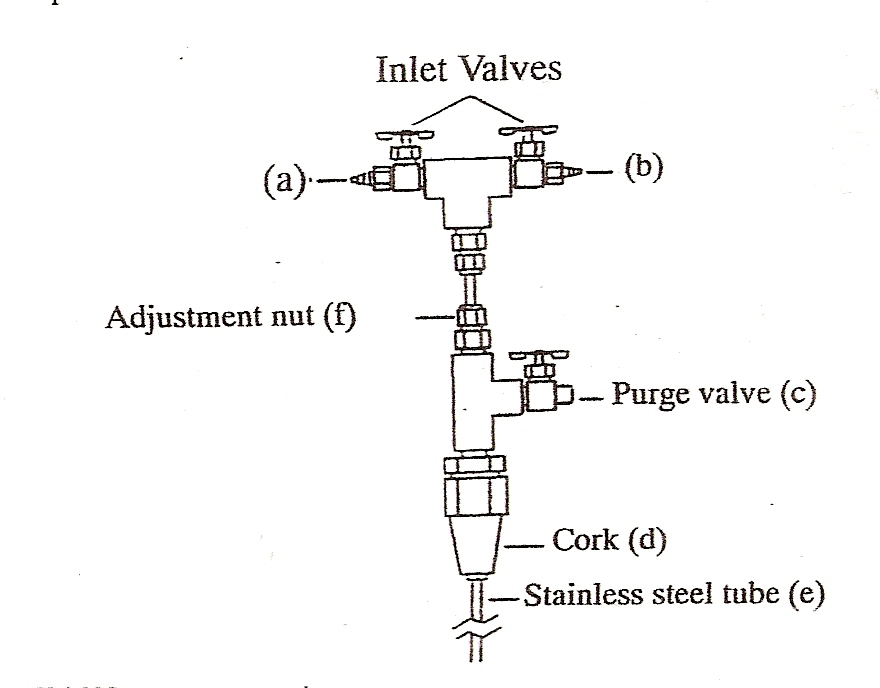
2) Connect one (a) of the two opposing inlet valves to the beer supply line from he keg. Splice the other side (b) into the keg’s CO2 supply line with a “T” connector. (This allows for the exact same pressure in the keg as at the bottle filler.)
3) With all lines connected, to both the keg and bottle filler, turn on the CO supply and adjust the pressure to between 1 and 15 psi, or as necessary to prevent foaming.
4) Be certain that all three valves (a, b & c) of the bottle filler are closed.
5) Firmly seat the bottle filler into the bottle. [The bottle filler should be adjusted so the stainless steel tube (e) is between 1/4” and 1/2” from the bottom of the bottle when the cork (d) is seated in the bottle neck]
6) Open the CO2 inlet valve (b), pressurizing the bottle Then open the purge valve (c) and allow to purge for 2 or 3 seconds. You should hear and/or feel gas escaping. Now close the purge valve (c), and then close the CO. inlet valve (b).
7) Open the beer inlet valve (a). No beer should flow. Then slowly open the purge valve (c), allowing beer to enter the bottle. Adjust it so the beer flows sufficiently yet does not foam.
8) When the bottle has filled to within ½” of the top, close the beer inlet valve (a). Remove the bottle filler and cap the bottle immediately.
9) Repeat steps 4) through 8) for each bottle to be filled.
HELPFUL HINTS:
Have the beer, bottle filler and bottles as cold as possible to help prevent foaming.
Do not tighten the inlet and purge valves (a. b & c) more than necessary to stop the flow, as they will be easier to open next time.
Do not over-tighten the nut (I) that adjusts the purge valve assembly on the stainless tube, as this could prevent any future adjustment.