|
|
Home ::
Using Your CO2 System
Using Your CO2 System
|
REGULATOR:
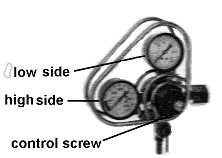
Your regulator will come with one or two gauges. All regulators
are equipped with a gauge to monitor the low side pressure which
is the pressure that exits the regulator out of the line that has
the gas quick-disconnect on it. Some regulators come equipped with
a second gauge that monitors the high side pressure. This is the
pressure in the tank thus the amount of gas that is left in it. |
 |
|
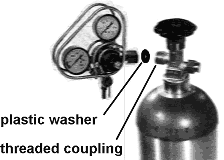
Using your regulator: First connect the regulator to the tank
using the threaded coupling making sure that you use the small plastic
washer in the coupling. The washer is very important and can usually
be found attached to a new regulator with some sort of tie. Once the
regulator is securely attached to the tank, turn the tank valve on.
The gauge monitoring the high side pressure will be reading. The
other gauge will not move until the control screw has been turned.
Turning the screw clockwise increased the low side pressure and
counterclockwise reduces the pressure. Remember that once you
pressurize a keg you can only drop the pressure by relieving
all the pressure and pressurizing again. This means that turning
your control screw counterclockwise will not change the pressure
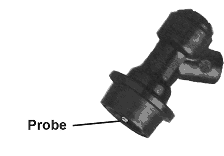
in the line or tank unless you relieve that pressure. The low side
pressure gauge will display keg and line pressure. To reduce the
pressure without a keg on the line requires relieving the pressure
from the line, push down on the probe in the center of the gas
quick-disconnect. |
 |
|
To dispense your beer you must first relieve the pressure
in the keg then connect the gas quick-disconnect and turn up the
regulator to 5 psi. Connect the liquid side quick disconnect with
hose and faucet. Open the faucet with the thumb lever and pour the
chilled beer into a glass. Be sure to tilt the glass at a 45 degree
angle and pour down the side if your beer is very foamy you may
wish to reduce this to about 2 or 3 psi. In most cases 5 psi is
the proper level. In a keg of homebrew the first couple of glasses
will have some sediment in them . This is the trub on the bottom
of the keg. The remainder of the beer will be clear. If you plan
to transport a new keg you may wish to remove a couple of glasses
to remove the trub before it gets disturbed. |
 |
|
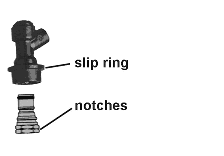
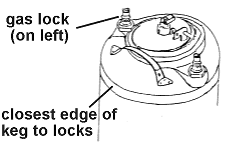
C-Keg:(Your C-Keg will be either ball-lock or pin-lock.)
The ball-lock dose not have pins on the sides of the locks,
confusing the liquid and gas lines is possible and will cause
damage to your equipment. The easiest way to tell the gas from
the liquid ( if not already labeled) is to examine the lock
closely. The gas side will often have notches in the bolt
portion of the lock. If you cannot find any notches position
the keg so that the locks are closest to you. In a standard keg
the gas side should be on your left. To connect a ball-lock
quick-disconnect, pull up on the slip-ring while sliding the
disconnect on, then release. The disconnect should grab the lock.
To disconnect, pull up on slip-ring and remove. |
 |
|
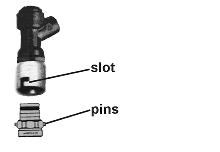
The pin-lock will have pins on the sides . These pins are used
to lock the pin-lock quick-disconnect onto the pin-lock. You
should have no problem confusing the "gas in" with the "liquid out"
because the liquid lock has three pins and the gas lock has two. One
will not fit on the other. To connect orient the pins to coincide with
the slots on the quick disconnect, push down and turn clockwise to lock.
Push down and counter-clockwise to unlock. |
 |
|
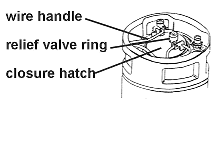
To open your C-Keg you must first relieve the pressure. Most
C-Kegs have a pressure relief valve in the center of the closure hatch.
The valve is operated by pulling on the small ring. If you do not have
a relief valve, then the pressure can be released by taking a key or
similar object and pushing down on the small circle in the center of
the gas ball-lock. In either case, when you no longer hear the gas
escaping, the pressure has been released. Once the pressure is released,
pull up on the wire handle attached to the closure hatch. With a little
downward pressure, the hatch will fall down in the C-Keg dangling form
the wire handle. Turn the hatch so it will fit out of the closure hole
and remove it. Closing the keg is a matter of reinserting the hatch,
carefully positioning the hatch in the center of the closure hole,
and folding the handle down to the original position. |
|
|
Using your C-Keg is easy. Simply clean and sanitize the inside of
the keg with some Amberdyne. Leave about a gallon of lite Amberdyne
solution in the keg. Close the keg and dispense the solution as you
would dispense your beer. When the keg is empty, repeat the process
with warm water. Your C-Keg is now ready for your beer. Fill the keg
with 5 gallons of beer and prime with no more than one half cup of
corn sugar. Close the keg and put 10 psi. in the keg to insure a
good seal. The beer will be carbonated in about 10 days. |
 |
|
Force carbonating your beer requires only two days but is a
little more work. First you must get your keg cold-45° F. or less. Turn
your regulator up to 35 psi., pressurize the keg with it, and shake the
keg vigorously until you can no longer hear the gas going through the
regulator. Keep the keg at 45° F. or less with 35 psi. in it until the
next day. The following day, disconnect the keg, relieve the pressure,
and tap the keg normally. If the beer is too carbonated, simply disconnect
the keg, and relieve the pressure every half hour until the desired level
of carbonation is reached. |
 |
|